Digibird.com
Digiscoping Primer--page 3


5) Camera controls--manual or automatic?

The blessing and curse of the Coolpix is the ability to assert full manual control over its imaging process. It's possible to make reasonable images through the scope with the camera in full automatic mode. However, as with conventional photography, a judicious combination of automatic and manual control will yield more consistent results. Set your camera to "M"; if you're not comfortable with the functions of the manual controls, go out and take photos (without the scope!) until you are.

Focus: There are two strategies here. For automatic focusing, focus the scope on the subject, and then allow the camera to autofocus through the scope. Use the "spot AF" selector to choose the part of the image on which the camera will focus; autofocus works best on a bright, contrasty part of the image. (This doesn't require razor-sharp scope focus, as the camera autofocus will compensate.) Use caution if you don't have a clear line of sight (if a branch hangs between you and the bird, for example) as the autofocus may not lock onto the bird.


Bad and good autofocus

Using the camera for autofocus is helpful when it's hard to clearly see the camera's preview screen. Outdoors with a Coolpix, it's almost always hard to clearly see the screen--especially if the sun is behind you, a common situation--and determining the point of best focus on that small preview can be difficult. Remember, however, that the camera's focusing process is not infallible--with autofocus, you are at the mercy of the camera's programming. These cameras were not designed for digiscoping, and the focusing requirements for digiscoping are much more rigorous than those for snapshot taking. Also, the autofocus process inserts a substantial delay (up to about a second) between pressing the shutter and firing as the lens racks in and out. Birds seem to sense what's happening, and enjoy moving significantly during that delay.

A better option is to use the "scope focus" technique: set the camera focus to infinity (distant landscape) and focus the preview image by focusing the scope. (Manual camera focus is too cumbersome and slow for scope photography.) Use the camera's focus confirmation to help determine best focus. If your scope support is adequate, the field of view won't change or vibrate while you focus.

The great advantage of this technique is that since the camera focus is fixed, there is no delay between depressing the shutter button and firing. It also gives you unambiguous control over the point of focus, even with an obstructed view. The focus point for the camera will be slightly different than that for your eye, so you'll need to tweak the scope focus for the camera. As noted, it can be hard to see the screen clearly in bright light, but the focus confirmation helps. It will help to zoom the camera in fully--both optically and digitally--to focus, and then out for proper framing. Shoot a couple of frames and examine the images carefully in playback. Remember: for both animals and people, tradition dictates that the eyes be in focus.


What can happen while the camera focuses

Exposure: Under many circumstances the aperture setting exerts limited control over exposure and depth of field. With a typical spotting scope at moderate to high magnifications, the effective aperture of the system is completely determined by the scope's exit pupil, not the diameter of the shutter. In the frame strip below, note that the image has barely darkened at f/7.5 (for which the exit pupil equals the camera aperture diameter at camera f=18 mm and 32x).
all frames 1/125 sec

f/3.4

f/4.2

f/5.3

f/7.5

f/9.5

Depending on the magnification of the scope and the focal length (zoom factor) of the camera, the effective aperture when digiscoping may be defined by either the camera's aperture setting (f/#) or the scope's exit pupil. Obviously, it's much easier to change aperture setting than exit pupil. However, if you don't want or need to puzzle over this, simply use exposure timing to control exposure.

For these shots, set the camera to aperture priority, and the camera will determine the appropriate shutter speed without further input from you. Using center-weighted metering will give you a well-balanced frame; use the focus-exposure lock to assure that a region of interest is properly exposed (this may severely under- or overexpose the rest of the frame, however) When in doubt, expose for the highlights. You can compensate for excessive shadowing using editing software later. If you choose to set exposure manually, set the aperture to the largest available diameter (f/4 at full zoom) to aid alignment between camera and scope.


Click for exposure tests

To freeze motion, set the fastest shutter time that available light allows. Motion, whether from the wind (remember a bird is often perched on a thin branch, and sways in the wind) or from scope vibration, blurs photos, so always use the fastest shutter speed possible. Especially at higher magnifications, digiscoping situations will often leave you wanting for illumination. Fortunately, frame intensity levels can be easily adjusted in post-processing.

If you are interested in exerting more detailed control over effective aperture, see the discussion here.

Color balance: This is one of the trickiest areas of digital photography, and the best general advice I can give is to simply set the control to automatic; if necessary, you can fix this later in post-processing. Most of the time, especially if the subject is well-illuminated, this will get pretty close. My impression is that the Nikon is a bit weak in the blue channel, resulting in a slightly yellow cast in the raw image. Almost any image editing software (even those available free) will let you tweak this.

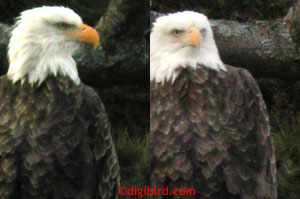
Sensitivity: The sensitivity of the CCD imager is set with the "ISO" control. This control is analogous to the film ISO (formerly ASA) rating, and involves an analogous tradeoff: as sensitivity increases, so does noise. Noise--a random distribution of light and dark pixel levels superimposed on your image--reduces the clarity of the final image, especially if overall light levels are low. Try to shoot at ISO 100. Only if you are desperate to obtain an image should you shoot at ISO 400.

Sharpening, contrast ('image adjustment'), 'best shot selector': You'd like the camera to minimize any adjustments of the recorded image; you'd rather take full control of this process with editing software. So set "sharpening" to off, "image adjustment" to "normal", and best shot selector to "off".


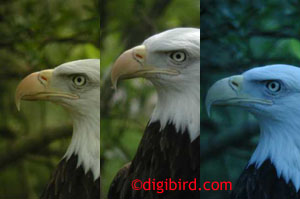
Click for color balance tests


Digibird link: wild eagles
Camera CCD noise at ISO=200 and 400


Click for ISO, metering, camera zoom tests

Next page
Previous page


All images copyright Digibird.com; unauthorized use or reproduction prohibited.

Go to Page 1 2 3 4
Return to Digibird home